 The quilt I've been working on this summer is finally in is finished form. I am overdue at mailing it, but not by too many days. It turned out that I wanted to do more hand quilting around the asymmetrical border and it took a bit more time than I budgeted. I also knew I wanted to include the darker green piping before binding and that little bit was kind of tricky.
Welcome to my blog. Here is where you'll find a bit of this and a bit of that. I enjoy writing about quilting, gardening, cooking, and other things as they come to mind.
Sunday, September 27, 2009
Summertime Hollyhocks
The quilt I've been working on this summer is finally in is finished form. I am overdue at mailing it, but not by too many days. It turned out that I wanted to do more hand quilting around the asymmetrical border and it took a bit more time than I budgeted. I also knew I wanted to include the darker green piping before binding and that little bit was kind of tricky.
Summertime Quilt Swap
Here is my newest, most lovely quilt, made for me by my swap partner, Gina Smith. Didn't she do a most perfect job in the design of this eyecatching quilt? I think so and will enjoy it always as everything about it is just what I love. She did the most wonderful job of quilting it in a carefree, swirly, and loopy pattern. How did she know that the 3-D look of the button embellishments would be so perfect for me?

 Quilting Bloggers held the swap this summer called "In the Good Old Summertime". My quilt arrived this weekend and here I am proudly showing it off. It was Saturday and my family was just coming home from the big 3 hour Oktoberfest parade and my quilting aunt Linda was with me. I looked in the mail box and what a pleasant surprise it was to see a package waiting for me. I opened the envelope right on the sidewalk by the front door. Out came this marvelous quilted burst of brightness. I just love it!!! Included in the package also was a box of very elegantly shaped chocolates. What could be better than a beautiful quilt and pretty chocolates?!!
 "Funky Flowers", by Gina Smith is perfect for my kitchen. I know it will look marvelous in my sewing room too, because I have curtain toppers made in the same delicious color scheme.


 Quilting Bloggers held the swap this summer called "In the Good Old Summertime". My quilt arrived this weekend and here I am proudly showing it off. It was Saturday and my family was just coming home from the big 3 hour Oktoberfest parade and my quilting aunt Linda was with me. I looked in the mail box and what a pleasant surprise it was to see a package waiting for me. I opened the envelope right on the sidewalk by the front door. Out came this marvelous quilted burst of brightness. I just love it!!! Included in the package also was a box of very elegantly shaped chocolates. What could be better than a beautiful quilt and pretty chocolates?!!
The black and white flowers are accented by the most colorful buttons. The whole quilt is just what I love. I am sure it will go in my sewing studio someday. Right now, I want it were everyone sees it; so I have hung it in my kitchen against the tile. As soon as you open the back door and step into our kitchen it gets noticed. I have had several other quilts that have hung there in the past, but this one definitely looks the best!
 "Funky Flowers", by Gina Smith is perfect for my kitchen. I know it will look marvelous in my sewing room too, because I have curtain toppers made in the same delicious color scheme.
Tuesday, September 22, 2009
First Day of Fall
 My 3rd graders have been working on some apple still life art pieces for the last 3 days in art class and we have hung the work in our school cafeteria. If you'd like to see more about how we did it you may want to visit my art teacher blog to discover the details, or visit the Artsonia website to see the entire set of
 Apple Arrangements.
 By Megan gr.3
By Megan gr.3Saturday, September 19, 2009
Help For an Old Sewing Cabinet
 I have a sewing machine table and a blue Singer beauty to go in the cabinet. However it is in need of a shabby chic re-do. I'll be on the lookout for a crystal knob for the front storage cubby. I have never done a project using the white enamel before. So this should be interesting. Does anyone out there in blog land have some tips they'd like to share with me?
 The only antiques I have preserved so far are steamer trunks. And I did not paint them with a shabby chic white. My brother has the extention table. He is using a glue injector to re-glue the loose wood laminate before I work on the paint.
The Singer Blue Beauty is safe in the house and it sews like a dream.
Monday, September 14, 2009
Making Salsa

After shopping at the Farmer's Market on Saturday, I was able to get more tomatoes and jalapenos for making salsa. I enjoy making salsa for my sister's husband each year around the time of his birthday.
Shown in the photo are some of my main ingredients for the recipe.
I'll use 6 large tomatoes, 1 red onion, 4 green onions, 2 cloves of garlic, 1 large jalapeno pepper or 3 small ones, 1/4 cup chopped cilantro, 2 cans fire roasted tomatoes, zest and juice from 1 lime, 2 Tablespoons olive juice, salt and pepper to taste, and a dash of oregano. I pre-chopped the tomatoes, onions, and peppers, then put the cilantro and crushed garlic into the blender with the cans of fire roasted tomatoes and gave it a few pulses. It makes the salsa be the perfect consistency. We love it and it goes quickly.
Friday, September 11, 2009
Weekend Garden Plans
It should be another pleasant weekend. The weather is still cooperating and it seems so summer-like. I must get into the garden and clip down more of those wild sunflowers. They grew in like crazy and I'd like fewer of them next year. It seemed like there was a certain kind of bug that lived on the stems and I don't like that happening to the degree that it was this summer. I'm afraid they turned into some kind of pesky fly.
I haven't ordered my tulips yet, but I do like the company called Colorblends. I found them in a catalog at first, but for the last 3 years I ordered on-line. The bulbs are sensationally big and very reliable. They come in bulk, so I usually plant for other people with what I order.
I haven't ordered my tulips yet, but I do like the company called Colorblends. I found them in a catalog at first, but for the last 3 years I ordered on-line. The bulbs are sensationally big and very reliable. They come in bulk, so I usually plant for other people with what I order.
Currently In Bloom


Monday, September 7, 2009
Hollyhock Wall Hanging Quilt
Here's just what I need to get going on the quilting of this wonderful wall hanging. I shopped yesterday at the great labor day sale over at Hancock's. It is a good time to be stocking up on anything sewing realated. Almost every notion and thread is 50% off through today. Most of the best quilting fabric is 40% off.


Today is the day to get serious about quilting the hollyhock quilt. I need to be able to mail it in the next 2 weeks. I really must do the quilting today in order to keep on schedule. I have been to the fabric shop to purchase all the necessarry supplies, so there can be no more excuses. The quilt is to be a suprise for a member of the quilting bloggers that signed up for the summer swap. Can't tell right now just to whom it will go. We'll have to wait on that detail.

I am really happy with how the top has turned out. I crazy pieced the neutral backing and then just went by my sketch to make the floral appliques. I knew I wanted to design an asymmetrical border so I just went at it with wider measurements for the bottom and right hand side. In the beginning I did not know that I would make the picket fence for the bottom. I found that block in a paper piecing book while the quilt was under construction.
Sunday, September 6, 2009
Inchies Christmas Ornament
I have been practicing the ornament idea
 that I saw posted with quilting bloggers. It showed up on my facebook this week and it looked like fun. I believe they will be having an ornaments swap this fall and I wanted to see what it was like to put one together before I sign up. It was a lot of fun and not too fussy, so I'll probably sign on. The tutorial by Nadine Ruggles explains it all very nicely. You can go there to see this version where the tiny little quilt squares get sandwiched between a ribbon or you can explore a little more and find out how to string them together with a beaded hanger. They are both very lovely. Below is a link to click on and it will take you to the tutorial by Nadine. http://inchiequilts.com/2009/09/04/inchie-ornaments-the-super-secret-project-revealed/
Anyway it gave me a chance to dig out all my crazy quilt stuff and get excited about beading again. Most of my supplies were tucked away in an old steamer trunk. It was fun to uncover things I haven't seen in a while. I should do more with crazy quilting.
Creative Quilting With Kids
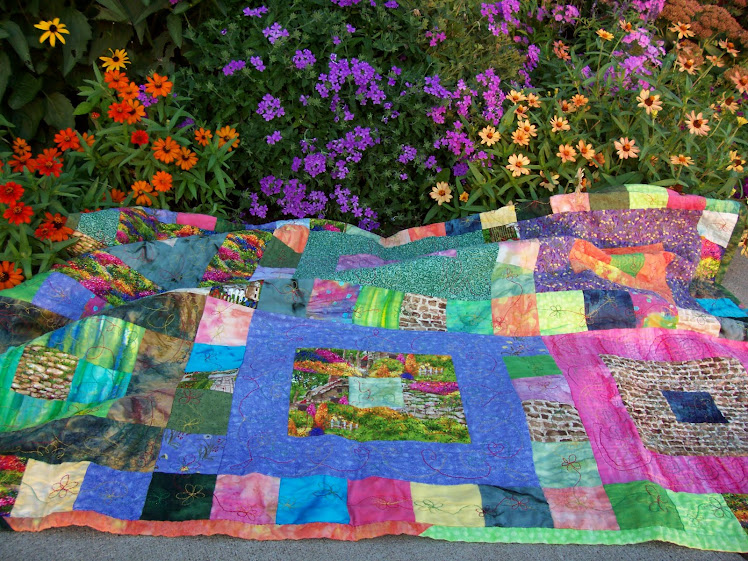
 These are the two quilts we made at school with the help of Diana Swim from West Salem. We were able to have her come to our school four 5 whole days and she worked with the classes during their regular scheduled art time to do the design of both quilts and make background patterns on the fabric panels.
Much of the color came from sheets of tissue paper and some was from Pebo sunreactive paint. The plant and animal images in the main body of the quilt are appliques that were made by using Portfolio brand water soluble oil crayons. The border blocks were made using the same supplies. The narrow inner border as well as the binding were tie
 dyed using a strong concentration of Kool Aid. Although both quilts have been bound, only one is ready to hang. The top quilt still has lots of places that need quilting. That's why you may see so many safety pins still attached to the quilt. I'll have to keep my focus on this during the year and add some more quilting. Perhaps they can both be done before the end of this school year. They are both very colorful and are interesting to look at. I hope we can find the right places to hang them in the school. If we ever did something like this again, I would make them a little smaller. These were overwhelming to quilt.
Subscribe to:
Posts (Atom)